Bonjour,
desolé pour l’anglais, je passe par google translator.
1 - En premier il faut créer un virtuel avec le plugin virtuel :
exemple :
Nom Timer :
Commandes :
Ici la commande « Run » permet de lancer le compte à rebours.
La valeur est appelé « Timer »
La valeur de Timer est :
#timestamp#+60
avec + 60 correspondant à 60 secondes.
Si on veut 5 minutes, il faut marquer + 300
La commande Stop permet d’arrêter le décompte.
2 - Créer le widget
Dans le plugin widget:
Ajouter un widget et completer le nom, version, type et sous titre comme indiqué sur l’image
Copier et coller le code donner par Almy :
<!-- WIDGET SPECIFIQUE  widget "tps_restant"

Modifications :
- update, _options.display_value, et stop fonction
Mise à jour :
- Le 2019/4/16 : conforme jeedom v3.3.20

Modification :
<span style="font-weight: bold; font-size: 12px;" class="cmdName">#name_display#</span><br/>

-->
<div style="min-width:90px; min-height:62px; margin-right:5px; margin-left:5px; padding:0px !important;" class="tooltips cmd cmd-widget" data-type="info" data-subtype="numeric" data-cmd_id="#id#" title="Valeur du #valueDate#, collectée le #collectDate#">
	<center>
      <span style="font-weight: bold; font-size: 12px;" class="cmdName"></span><br/>
      <span style="font-size: 1.5em; font-weight: bold;" id="countdown_#id#_decompte"></span>
    </center>
	<script>
        jeedom.cmd.update['#id#'] = function(_options){
var timestamp = parseFloat(_options.display_value);
		$(function (e) {
			if (timestamp > 0) {
				 interval#id# = setInterval(function () {
					var now = (new Date()).getTime(); // On déclare la date d'aujourd'hui.
					var tps_restant =timestamp*1000 - now; // Temps restant en millisecondes

					// console.log("interval("+intervalId+")");

					if (!$('#countdown_#id#_decompte').length || timestamp < 0 || tps_restant < 0) {
						// console.log("clearInterval("+intervalId+")");
						clearInterval(interval#id#);
						$('#countdown_#id#_decompte').text('  ');
					} else {
					  //============ CONVERSIONS
					  var s_restantes = tps_restant / 1000; // Secondes restantes
					  var i_restantes = s_restantes / 60; // Minutes restantes
					  var H_restantes = i_restantes / 60; // Heures restantes

					  s_restantes = Math.floor(s_restantes % 60); // Secondes restantes
					  i_restantes = Math.floor(i_restantes % 60); // Minutes restantes
					  H_restantes = Math.floor(H_restantes); // Heures restantes
					  //==================

					  //============ FORMATTAGE
					  s_restantes = s_restantes < 10 ? "0"+ s_restantes : s_restantes;
					  i_restantes = i_restantes < 10 ? "0"+ i_restantes : i_restantes;
					  H_restantes = H_restantes < 10 ? "0"+ H_restantes : H_restantes;
					  //==================

					  if (H_restantes > 0) {
                        $('#countdown_#id#_decompte').text(H_restantes + ":" + i_restantes + ":" +s_restantes);
                      } else {
                        $('#countdown_#id#_decompte').text(i_restantes + ":" +s_restantes);
                      }
					}
				}, 1000);
			}else {

						clearInterval(interval#id#);

						$('#countdown_#id#_decompte').text('  ');
              e.stopPropagation();
            }
		});
        }
  jeedom.cmd.update['#id#']({display_value:'#state#',valueDate:'#valueDate#',collectDate:'#collectDate#',alertLevel:'#alertLevel#'});

	</script>
</div>
Ensuite : appuyer sur "appliquer sur les commandes " en haut à droite et affecter le widget au virtuel « Timer »
3 - créer un scénario :
Je te donnes l’exemple d’un scénario pour allumer une prise électrique, il faut l’adapter à ton alarme :
Général :
Indiquer nom,
Mode scenario : « Provoqué »
Evenement : « changement état de la prise »
exemple :
Sénario :
Si : l’état de la prise devient 1
Alors : 1 - dans une minute ou dans 5 minutes (ici 1 minute correspondant à +60 dans le virtuel)
faire : mettre la prise en off
2 - action lancer le timer
exemple :
Voilà, je pense que tu as tout pour adapter à ton alarme en modifiant les entrées.
En anglais …
Hello,
sorry for english, i go through google translator.
1 - First you have to create a virtual with the virtual plugin:
example:
Timer name:
! [Image | 690x108] (upload: //AqfqvJK3k85eRC4krsSimqEZdsM.jpeg)
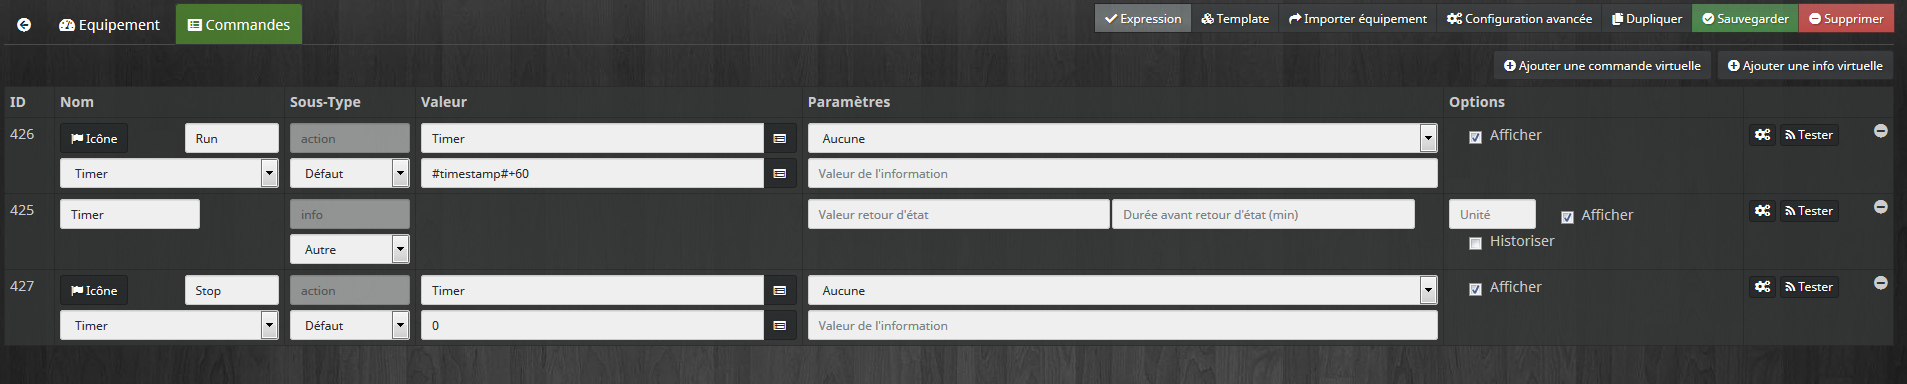
Orders :
! [Image | 690x138] (upload: //8Xr05ZapVLYDTmbJdDQh0HNUUS0.png)
Here the « Run » command starts the countdown.
The value is called « Timer »
The value of Timer is: # timestamp # + 60
with + 60 corresponding to 60 seconds.
If you want 5 minutes, you have to mark + 300
The Stop command stops the count.
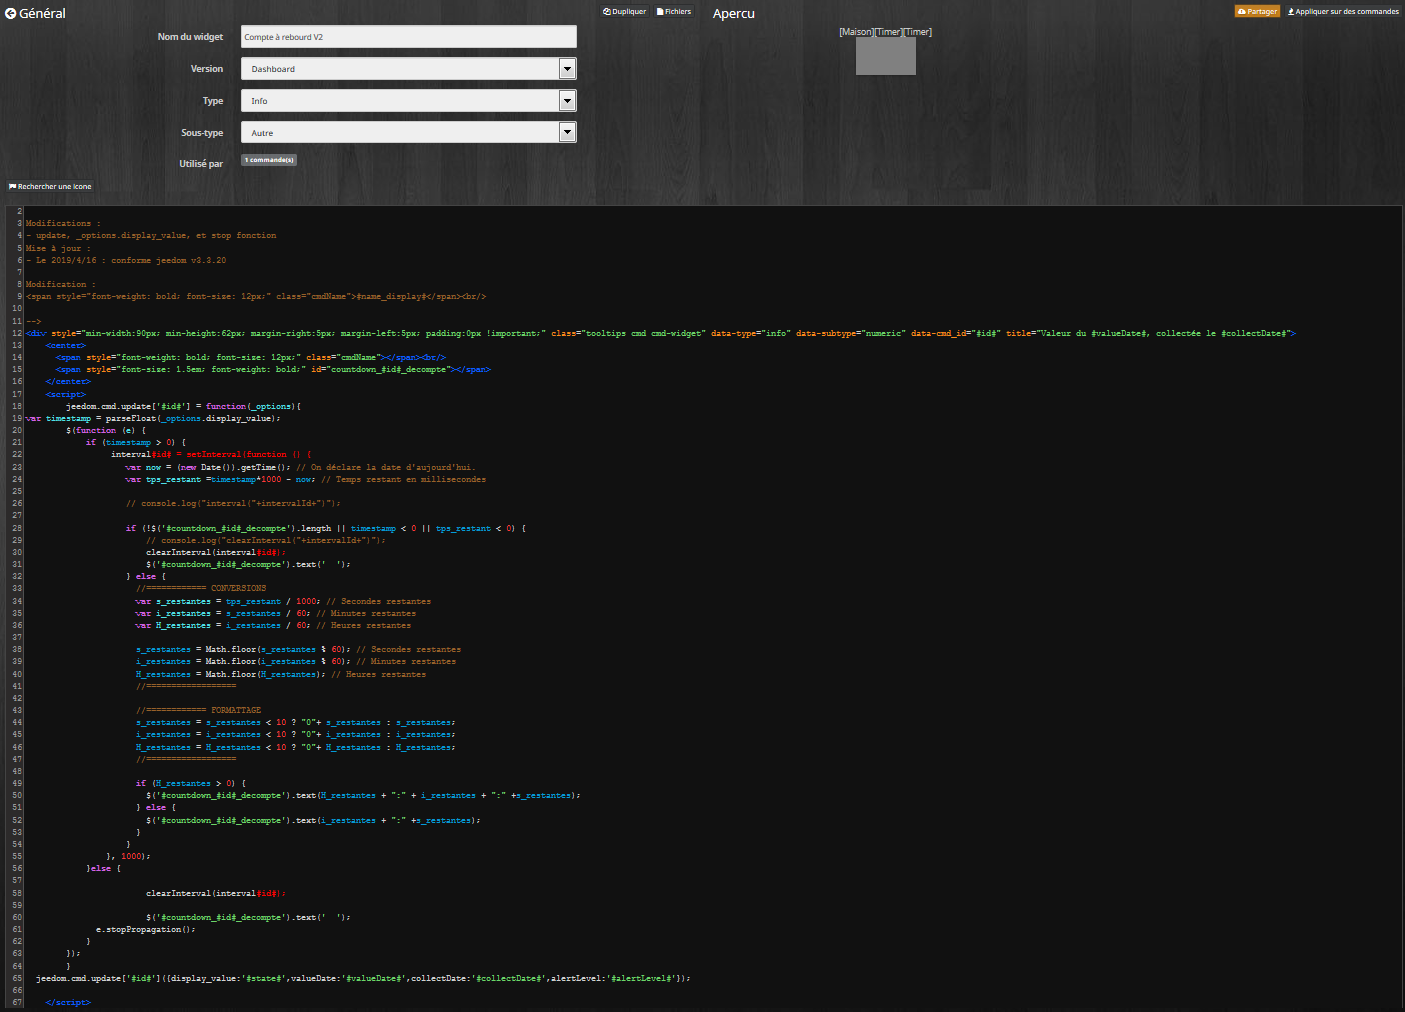
2 - Create the widget
In the widget plugin:
Add a widget and complete the name, version, type and subtitle as shown in the image
! [Image | 690x496] (upload: //dynRLTjOdnBDYTfiGBBzGSXmmYW.png)
Copy and paste the code by Almy :
<!-- WIDGET SPECIFIQUE  widget "tps_restant"

Modifications :
- update, _options.display_value, et stop fonction
Mise à jour :
- Le 2019/4/16 : conforme jeedom v3.3.20

Modification :
<span style="font-weight: bold; font-size: 12px;" class="cmdName">#name_display#</span><br/>

-->
<div style="min-width:90px; min-height:62px; margin-right:5px; margin-left:5px; padding:0px !important;" class="tooltips cmd cmd-widget" data-type="info" data-subtype="numeric" data-cmd_id="#id#" title="Valeur du #valueDate#, collectée le #collectDate#">
	<center>
      <span style="font-weight: bold; font-size: 12px;" class="cmdName"></span><br/>
      <span style="font-size: 1.5em; font-weight: bold;" id="countdown_#id#_decompte"></span>
    </center>
	<script>
        jeedom.cmd.update['#id#'] = function(_options){
var timestamp = parseFloat(_options.display_value);
		$(function (e) {
			if (timestamp > 0) {
				 interval#id# = setInterval(function () {
					var now = (new Date()).getTime(); // On déclare la date d'aujourd'hui.
					var tps_restant =timestamp*1000 - now; // Temps restant en millisecondes

					// console.log("interval("+intervalId+")");

					if (!$('#countdown_#id#_decompte').length || timestamp < 0 || tps_restant < 0) {
						// console.log("clearInterval("+intervalId+")");
						clearInterval(interval#id#);
						$('#countdown_#id#_decompte').text('  ');
					} else {
					  //============ CONVERSIONS
					  var s_restantes = tps_restant / 1000; // Secondes restantes
					  var i_restantes = s_restantes / 60; // Minutes restantes
					  var H_restantes = i_restantes / 60; // Heures restantes

					  s_restantes = Math.floor(s_restantes % 60); // Secondes restantes
					  i_restantes = Math.floor(i_restantes % 60); // Minutes restantes
					  H_restantes = Math.floor(H_restantes); // Heures restantes
					  //==================

					  //============ FORMATTAGE
					  s_restantes = s_restantes < 10 ? "0"+ s_restantes : s_restantes;
					  i_restantes = i_restantes < 10 ? "0"+ i_restantes : i_restantes;
					  H_restantes = H_restantes < 10 ? "0"+ H_restantes : H_restantes;
					  //==================

					  if (H_restantes > 0) {
                        $('#countdown_#id#_decompte').text(H_restantes + ":" + i_restantes + ":" +s_restantes);
                      } else {
                        $('#countdown_#id#_decompte').text(i_restantes + ":" +s_restantes);
                      }
					}
				}, 1000);
			}else {

						clearInterval(interval#id#);

						$('#countdown_#id#_decompte').text('  ');
              e.stopPropagation();
            }
		});
        }
  jeedom.cmd.update['#id#']({display_value:'#state#',valueDate:'#valueDate#',collectDate:'#collectDate#',alertLevel:'#alertLevel#'});

	</script>
</div>
Then: press « apply to the controls » at the top right and assign the widget to the virtual « Timer »
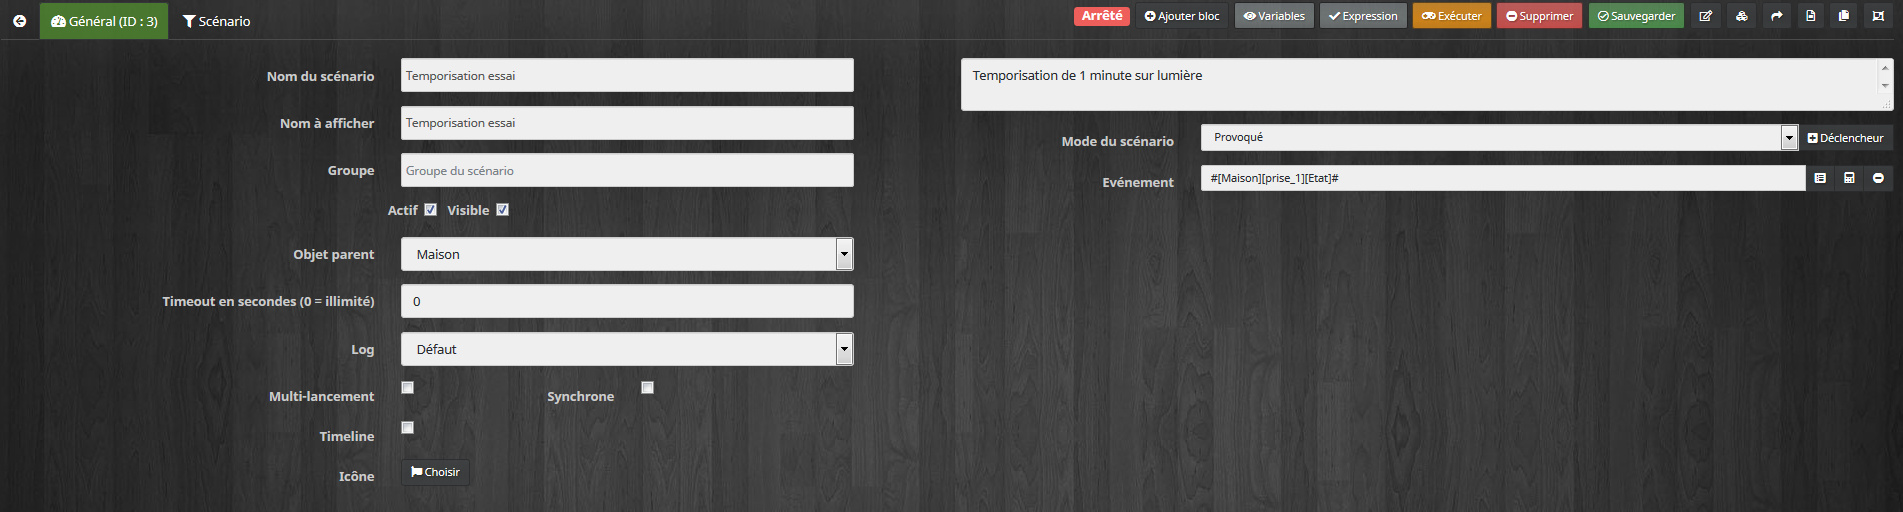
3 - create a scenario:
I give you the example of a scenario to light an electrical outlet, it must be adapted to your alarm:
General:
Indicate name,
Scenario mode: « Provoked »
Event: « change taking state »
example:
! [Image | 690x185] (upload: //y7Tc2zxtKAhQI4NNuinohcpYo9Z.jpeg)
Senario:
If: the state of the plug becomes 1
Then: 1 - in a minute or in 5 minutes (here 1 minute corresponding to +60 in the virtual)
to do: put the plug in off
2 - action start the timer
That’s it, I think you have everything to adapt to your alarm by changing the entries.

